Creating Custom AI Skins and Texture Families
In this tutorial we will be making custom textures and skins for Thief 2 and we'll be using Adobe Photoshop, Paintshop Pro and Bright. You should be able to use these techniques for Thief 1/G too but that won't be dealt with here. This tutorial assumes you know where to save your custom images and how to apply them to your AI. Also I recommend using Psp because it's a lot easier.
First we will be changing one of the original AI skins. If you haven't already done so extract mesh.crf from your 1st Thief 2 CD. (This is a large file, 34M)
PaintShop Pro :
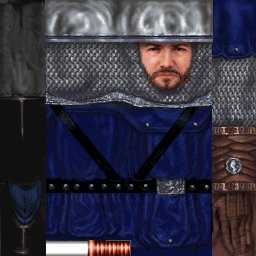
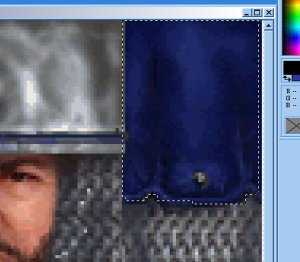
The skin I have chosen is POLICE03.GIF.(256x256 pixels, 8 bit, 256 colours)
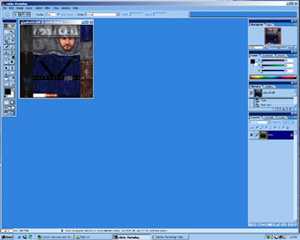
Load your image in PaintShop Pro(left) or Photoshop(right)

For now we'll just change the uniform colour of the policeman. First change the colours to 16 Million. in Painshop Pro Or if you have Adobe Photoshop
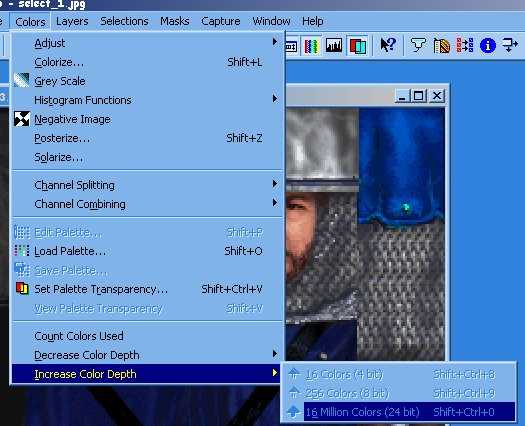
As you can see it is greyed out on mine because I have already converted it.
In Psp select the Freehand tool ![]() or in Photoshop select the lasso tool
or in Photoshop select the lasso tool 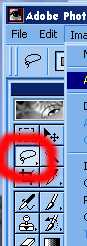
You can also use the magic wand tool but you'll need to play with the settings to get it work properly for you.
And draw around the area you want to alter, I have selected the sleeve
If you press and hold the Shift key you can select multiple areas, That way you can alter the whole uniform in one go.
.
Now in Paintshop pro goto the menu : Colours>Adjust and select
Red/Green/Blue or in Photoshop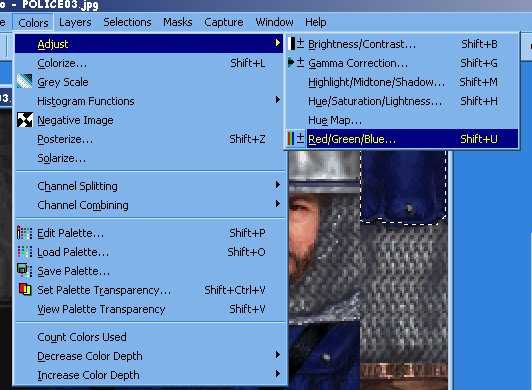
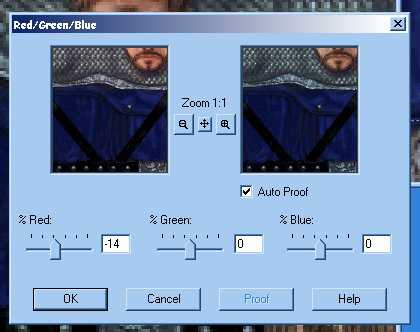
Then alter the sliders to whatever takes your fancy.
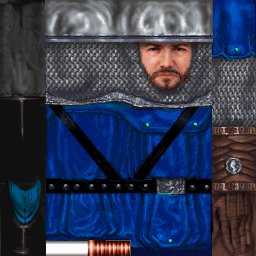
Here you can see the whole uniform is a lighter blue. Remember you can change this image however you like. You can even cut the face from another AI skin and paste it onto your new one if you like. The world is your oyster.
When you have your image to your liking it is now time to save it in the correct format. (If using Bright or Photoshop)
At this stage, I recommend you use bright to convert it to 256 colours
Decrease the colour depth back to 256 colours
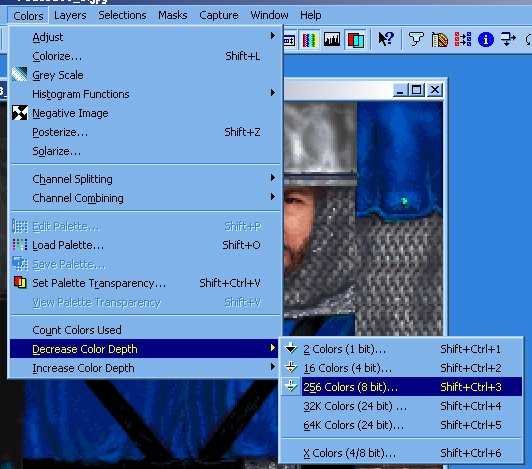
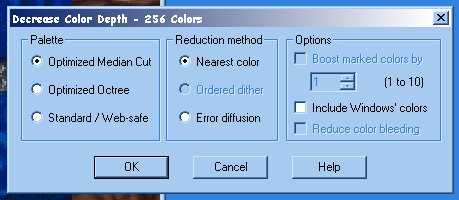
I use these settings. But you might get better results with Optimized Octree instead.
Your image quality will change, don't worry too much unless it really looks naff ;-)
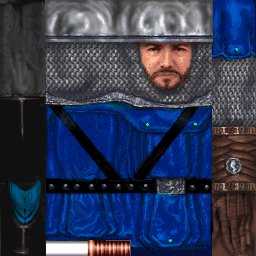
The NEW 8 bit image.
Once converted you need to save this image as a .Gif file. It is almost ready to use in Thief 2. If you were to use it now there would be transparent areas. In-game you'll be able to see through parts of your AI. (Not Good) This is because the 1st colour in the palette is transparent. We need to change it like this :
Select the Colour Menu and Edit Palette 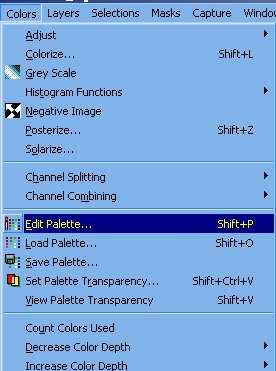
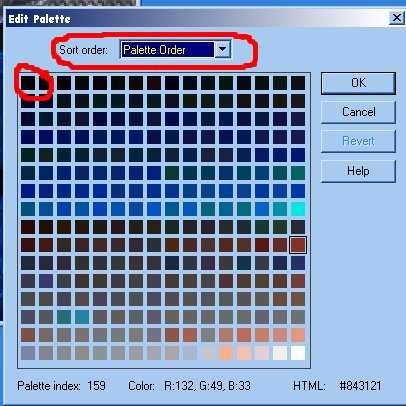 If it isn't
already set the pulldown to Palette Order.
If it isn't
already set the pulldown to Palette Order.
Then double-click the top left colour.and select the hot pink colour. 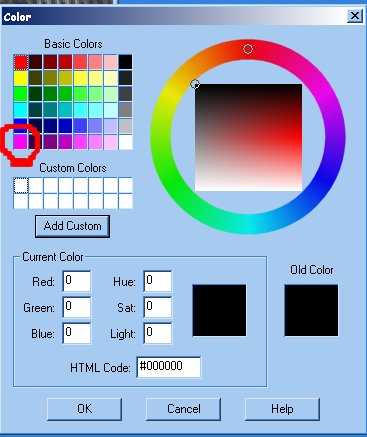
Then select OK, You'll see the colour 0 has changed in the Edit Palette window. Select OK. Your image has changed now too. Whatever has turned pink will be transparent.
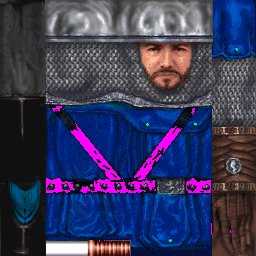
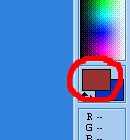
Now you need to pick a new colour and paint over the pink. Click the colour swatch and the palette window will pop up. Select the correct colour, In our case Black (or nearest) and paint over the pink. And finally Save our New skin.
There is an easier way to do the above using Colour Swapper. ![]() Select the dropper tool, 3 above the Colour Swap tool. Next click
the foreground colour swatch and select the pink (colour 0) and click
OK. Then click the background colour swatch and select the right
colour(in our case Black) Now we are ready to get rid of the pink transparent
area's. Select the Swapper tool and hold the right mouse button
while painting over the pink area's. All of the pink(colour 0) should now be
gone. Save.
Select the dropper tool, 3 above the Colour Swap tool. Next click
the foreground colour swatch and select the pink (colour 0) and click
OK. Then click the background colour swatch and select the right
colour(in our case Black) Now we are ready to get rid of the pink transparent
area's. Select the Swapper tool and hold the right mouse button
while painting over the pink area's. All of the pink(colour 0) should now be
gone. Save.
It's now ready to use in Thief 2 ;-)
Same as the above but these are the differences.
Increasing the colours :
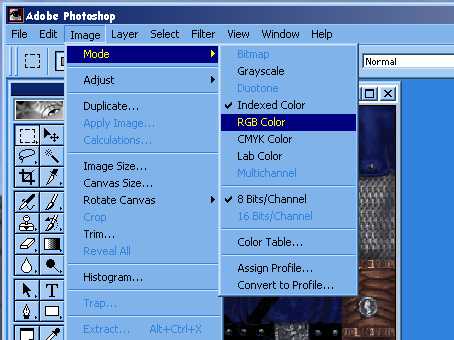
Select Image>Mode>RGB Colour, Then Select Image>Mode>16 Bits/Channel to increase the colour depth.
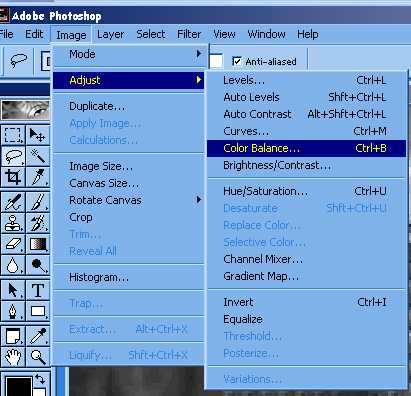
Adjusting the colours Select Image>Adjust>Colour Balance
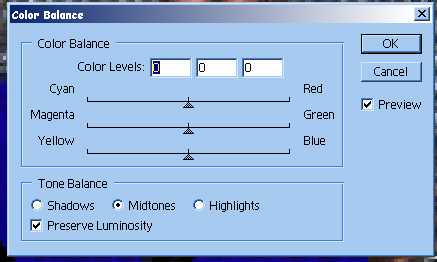
Move the sliders to get a colour you like. (You can use any other tool too but in this tut we are just changing the colour) I set Magenta to -100 and Yellow to +100 to get a lighter shade of blue.
When you've finished editing your image you should save it as a .TGA file and convert it using Bright for BEST Results.Or Select Image>Mode>8 Bits/Channel and then Select Image>Mode>Indexed Colour to get it back to 256 colours. (I found my picture went a bit grainy hence I used Bright to finish it off.)
Finally we can use Bright. You need to go into DOS to use this great little program. (I might write a visual basic program so this can be done in the windows environment.)
Until then this is what we will do :
We have our New Image still at 16 million colours. We need to save it in the .tga format (you can also save as a .bmp we need as much colour info as can be saved) Save it in a temporary folder with easy access like C:\Temp. Start Command Prompt or DOS Prompt if it is called that on your machine. If you don't see C:\> then you need to type CD.. and press Enter. Then type CD Temp then press Enter. Now type dir and you should now be in your Temp folder on your C drive.
18/06/2002 13:57 188,831 POLICE03_b.tga
Here is the file we created. I called it POLICE03_b.tga Don't overwrite your originals!
To use bright you should have placed the Bright.exe into your windows folder so the system knows where to find it.
Now at the DOS Prompt type : bright -com -pinkm -wri full.pcx *.tga (Observe the spaces after each command. I don't know what all the commands do, There is a readme file) Then press Enter.
Bright will now convert your image :
C:\Temp>bright -com -pinkm -wri full.pcx *.tga
BRIGHT 1.83 (c) 2000 Erik de Neve / Epic Games, Inc.
Best palette Reduction for Industrial Grade High quality Textures.
Epic Games, Inc. retains all copyrights to this software.
Not-for-profit public distribution allowed.
Starting batch processing:
Queued for processing: 0 POLICE03_b.tga
Component sampling depths: 8, 8, 8
Quantizing in YCbCr colorspace.
Target colors: 255
Sampling file: POLICE03_b.tga
Image input size: 256 x 256
Cumulative color bins: 7010
Reverting to lower sampling depth:
Component sampling depths: 8, 8, 7
Quantizing in YCbCr colorspace.
Target colors: 255
Sampling file: POLICE03_b.tga
Image input size: 256 x 256
Cumulative color bins: 7010
Reverting to lower sampling depth:
Component sampling depths: 8, 7, 7
Quantizing in YCbCr colorspace.
Target colors: 255
Sampling file: POLICE03_b.tga
Image input size: 256 x 256
Cumulative color bins: 7010
Reverting to lower sampling depth:
Component sampling depths: 7, 7, 7
Quantizing in YCbCr colorspace.
Target colors: 255
Sampling file: POLICE03_b.tga
Image input size: 256 x 256
Cumulative color bins: 7010
Reverting to lower sampling depth:
Component sampling depths: 7, 7, 6
Quantizing in YCbCr colorspace.
Target colors: 255
Sampling file: POLICE03_b.tga
Image input size: 256 x 256
Cumulative color bins: 6160
Quantizing with special mask color.
Quantizing...Colors: 6160 -> 255 Done.
Remapping file to common palette: POLICE03_b.tga
Image input size: 256 x 256
Remapping to palette...
Writing remapped image...
C:\Temp>
Now type dir at the prompt and you'll see your new image/s and a file called Full.pcx. This is only needed if you make texture families. We'll deal with them in a minute.
18/06/2002 13:57 188,831 POLICE03_b.tga [Our original image/skin]
18/06/2002 14:13 75,395 POLICE03_b.pcx
18/06/2002 14:13 11,137 full.pcx
Load the .pcx file into Psp or Photoshop and simply save it as a .Gif file. No need to change colour 0 because Bright has already done this for us. You can now use it in Thief 2
This part of the tutorial will not go into detail of cropping or making your chosen textures seamless, It assumes you have that knowledge. Thief textures are many different sizes, ranging from 32x32 to 256x256. You can have any size as long as it's 32, 64, 128 or 256 (i.e. 32x64 or 256x128) You choose what you want. If you have a texture that is taller than it is wide then you would need to size your image at 64x128 or 64x256 etc. If your texture is square then use 64x64 or 128x128, Get the drift? There is a good tutorial by Chiefdreams covering this topic too.
Find some images that you would like to use for your new textures. There are loads on the net so check out the free texture sites or you could use your own photos etc. and textures from your 3d packages.
When you've chosen your textures you'll probably need to crop and resize them and save them as .tga for the purpose of this tutorial and put them in their own folder. Only have about 8-12 pics per family and try to use similar colours as they need a common palette of 256 colours. Using Bright you can then convert them into .pcx files for your fm and create the common palette for your textures.
Open the Command/DOS Prompt and browse to the folder where your textures are ( if you put your textures in C:\Temp\MyTex then you'd type in :
CD.. and press enter (repeat in necessary) until you see C:\> in the DOS window then type CD TEMP\MYTEX you should then be in your folder. Type DIR and press Enter. You should now see your textures listed in the window)
When you're there type bright -com -pinkm -wri full.pcx *.tga (Observe the spaces after each command) This will make your textures into .pcx format and it will make you a common palette called full.pcx. When bright has done it's job type EXIT at the DOS prompt. Then in Windows Explorer browse to your texture folder and copy ALL the .pcx files into your Thief2/Fam/MyTex folder.(Or whatever folder you like as long as it is in Thief2/Fam/ )
They are now ready to use in Dromed. In the Textures Menu select Add Family and type MyTex (the name of the folder in Fam, Or whatever folder you've stored them in)
End of Tutorial. If you've used this tutorial I'd be grateful for some feedback, Or if you have further questions.
This Tutorial is the copyright of Thorin Oakenshield a.k.a. Mike Eyre (c)2002